Table of Contents
The Gladius and the Pilum: How Rome’s Weapons Forged an Empire
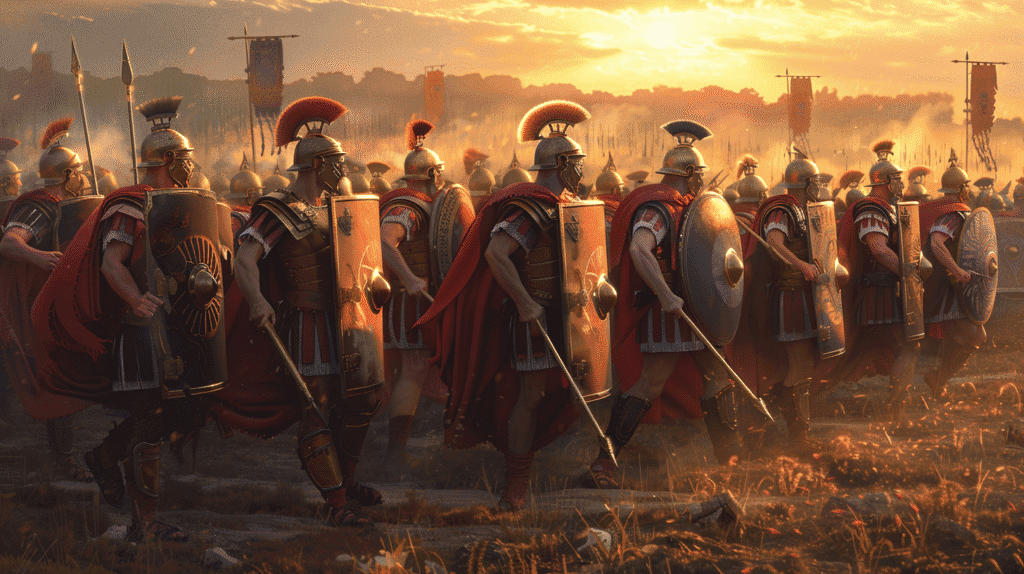
Picture the scene: It’s 216 BCE at Cannae, and you’re a Roman legionary in the largest army Rome has ever fielded. Across the field, Hannibal’s forces wait. Your centurion barks orders. You check your equipment—the short sword at your hip, the two heavy javelins in your left hand, the reassuring weight of your shield on your arm. In minutes, you’ll throw those javelins with devastating force, then close with your sword in the brutal work of close combat.
These two weapons—the gladius (sword) and pilum (javelin)—weren’t just tools of war. They were the physical embodiment of Roman military philosophy: disciplined, efficient, and devastatingly effective. While other armies relied on individual warrior prowess or overwhelming numbers, Rome created a system where relatively ordinary men, equipped with carefully designed weapons and relentless training, could defeat seemingly superior forces through coordination and tactical precision.
For over 500 years, from the middle Republic through the height of Empire, these weapons defined Roman military supremacy. They conquered Gaul, Britannia, Spain, Greece, Egypt, and countless other territories. They defeated Carthaginian war elephants, Gallic chariot charges, Greek phalanxes, and Germanic tribal warriors. They transformed Rome from an Italian city-state into an empire spanning three continents.
But what made these weapons so effective? How did a relatively simple short sword and a throwing spear enable such extraordinary military success? And what can studying these ancient weapons teach us about military innovation, tactical thinking, and the relationship between technology and strategy?
This comprehensive guide explores every aspect of the gladius and pilum—their design evolution, tactical employment, psychological impact, and lasting legacy. You’ll discover how Rome turned weapons into a system, and how that system changed the ancient world.
The Gladius: Rome’s Signature Blade
The gladius is perhaps the most iconic sword in Western military history. Its very name has entered common language—giving us words like “gladiator” and inspiring countless replicas, museum displays, and popular culture depictions. But beyond its fame lies a fascinating story of adaptation, innovation, and tactical brilliance.
Origins and Evolution: Adapting Enemy Weapons
The gladius’s origin story reveals something fundamental about Roman military culture: the willingness to adopt and improve upon enemy innovations rather than rigidly adhering to tradition.
The Iberian influence (3rd century BCE):
During the Punic Wars (264-146 BCE), Roman soldiers encountered Iberian mercenaries fighting for Carthage who wielded distinctive swords called falcata or gladius hispaniensis (Hispanic sword).
What Romans observed: These Iberian blades were shorter than the long slashing swords common in Celtic and Greek warfare, but in close combat they proved devastatingly effective. The sword’s design emphasized both cutting and thrusting capability, and its compact size allowed wielders to fight effectively in tight formations.
Roman adaptation: Rather than dismissing foreign weapons as inferior, Roman military planners recognized superior design when they saw it. They adopted and adapted the Iberian blade, modifying it to suit Roman tactical doctrine and manufacturing capabilities.
The evolutionary process: The gladius evolved through several distinct patterns over centuries, each refined based on combat experience and changing tactical needs.
Types of Gladius: Regional Variations
Archaeological evidence has identified several distinct gladius patterns, each associated with different periods and regions of the Roman Empire.
Gladius Hispaniensis (3rd-2nd century BCE):
Characteristics: The earliest Roman pattern, most directly derived from Iberian designs. Blade length approximately 60-68 cm (24-27 inches), with a pronounced waist (narrowing in the middle) and leaf-shaped point.
Weight: Approximately 1-1.2 kg (2.2-2.6 lbs), carefully balanced for both cutting and thrusting
Era: Used primarily during the Middle and Late Republic, including during the conquest of Mediterranean territories
Combat emphasis: Good balance between cutting and thrusting, suitable for various combat situations
Mainz Type (Gladius Moguntiacensis, 1st century BCE – 1st century CE):
Named for: The German city of Mainz (Roman Moguntiacum), where several examples were discovered
Characteristics: Blade length 50-55 cm (20-22 inches), with a long tapering point and relatively parallel edges with slight waist
Innovation: Lighter and more agile than Hispaniensis, reflecting refinement toward pure thrusting emphasis
Period: Common during the late Republic and early Empire, including Caesar’s Gallic campaigns
Pompeii Type (Gladius Pompeianus, 1st century CE onwards):
Named for: Examples preserved in volcanic ash at Pompeii
Characteristics: Blade length 45-50 cm (18-20 inches), shorter than earlier types, with parallel edges and a triangular point
Design philosophy: Even more optimized for thrusting in tight formations, reflecting mature Roman tactical doctrine
Period: Standard throughout the height of the Empire
Weight reduction: Lighter than earlier types while maintaining structural integrity
Fulham Type (late 1st – 2nd century CE):
Characteristics: Similar to Pompeii type but with even more parallel edges and a shorter, more triangular point
Regional association: More common in Britain and northern frontier regions
Tactical context: Designed for the close-quarters combat common in forest and urban warfare
Design Features: Engineering for Efficiency
Every aspect of the gladius’s design served specific tactical purposes. Roman military engineers understood that weapon design involved trade-offs, and they optimized for what mattered most in Roman tactics.
Blade characteristics:
Length (45-70 cm depending on type): Short enough for close-quarters combat in tight formations, long enough to reach vital targets past an opponent’s guard
Width (5-7 cm at widest point): Sufficient for structural strength and cutting power without excessive weight
Double-edged: Both edges sharpened, allowing cuts from any angle, though primary emphasis remained on thrusting
Pointed tip: All gladius types featured sharp, reinforced points engineered specifically for penetrating armor and flesh
Fuller (blood groove): Central groove running along blade length, reducing weight while maintaining rigidity and preventing suction when withdrawing from wounds
Hilt design:
Grip length: Approximately 10-13 cm (4-5 inches), sized for single-hand control with secure purchase
Material: Typically wood, bone, or ivory, often wrapped with leather for better grip
Spherical pommel: Large rounded or disk-shaped counterweight at grip’s end, essential for balance and also useful for striking in desperate situations
Guard (crossguard): Small but functional, protecting the hand while not interfering with quick draw from scabbard
Weight and balance:
Total weight: 0.7-1.2 kg (1.5-2.6 lbs) depending on type and size
Balance point: Typically 10-15 cm (4-6 inches) from guard, providing excellent control for both cutting and thrusting motions
Engineering principle: The gladius was balanced for quick recovery after thrusts, allowing rapid sequential attacks
Scabbard and Carry System
The gladius was useless if it couldn’t be drawn quickly and reliably in combat situations.
Scabbard construction:
Materials: Wood core covered with leather, often reinforced with bronze or brass fittings
Suspension: Worn on the right side (not left as with later medieval swords), suspended from a balteus (sword belt) worn over the shoulder
Why the right side?: This positioning seems counterintuitive (most right-handed people would naturally draw from the left), but it served specific tactical purposes:
- Prevented the scabbard from interfering with the large rectangular shield (scutum) carried on the left arm
- Allowed soldiers in formation to draw without bumping into comrades
- Enabled draw motion that was upward and forward, flowing naturally into a thrust
Quick-release system: Sophisticated suspension systems allowed rapid drawing even while holding shields and pila
Combat Techniques: The Art of the Thrust
Roman gladius combat doctrine was revolutionary for its time and fundamentally different from other contemporary sword-fighting styles.
“Stab, don’t slash”—The fundamental principle:
While the gladius could cut effectively, Roman military training emphasized thrusting over slashing for several crucial reasons:
Efficiency: Thrusting motions require less energy and recover faster than wide slashing arcs
Reach: A thrust extends your effective reach significantly compared to a slash
Lethality: Roman military physicians understood that puncture wounds to vital areas (abdomen, throat, chest) were far more likely to cause rapid death than cuts
Protection: Thrusting allows the soldier to remain largely protected behind his shield, with only the sword arm extended. Slashing requires opening your defense and exposing more of your body.
Formation compatibility: In the tight formations Romans preferred (soldiers standing approximately 1 meter apart), wide slashing motions were impractical and could injure comrades. Thrusts worked perfectly in confined spaces.
Historical evidence: The historian Vegetius (writing in the late 4th century CE but describing earlier practices) explicitly notes Roman preference for thrusting, stating: “A slash-cut, whatever its force, seldom kills… A thrust going in two inches is fatal.”
The gladius in formation combat:
Roman tactical doctrine centered on formation integrity. The gladius was designed to work within this system:
The testudo (tortoise): When advancing against missile fire, legionaries formed overlapping shields creating a protected “box.” In this extremely tight formation, only short thrusting weapons like the gladius remained usable.
The triple line (triplex acies): Standard Roman battle deployment used three lines of soldiers. As front-line fighters tired, they rotated back and fresh troops moved forward. This rotation required weapons that could be safely maneuvered in close proximity to friendly troops.
Shield-sword coordination: Roman fighting style integrated the large rectangular shield (scutum) and gladius as a unified system. The shield protected while creating openings; the gladius exploited those openings with precise thrusts.
Training regimen:
Roman soldiers trained with the gladius for years before seeing combat, using:
Wooden training swords (rudis): Made heavier than real gladii to build strength and endurance
Training posts (palus): Soldiers practiced strikes against wooden posts, drilling precise targeting of vital areas
Repetition: Ancient sources describe soldiers practicing thrusts thousands of times, building muscle memory so actions became instinctive
Full-contact training: Romans used protective equipment (including helmets and arm guards) to practice against live opponents, building reflexes and tactical awareness
Psychological and Cultural Significance
The gladius transcended its functional role to become a powerful symbol of Roman identity and power.
Symbol of citizenship and manhood: Receiving a gladius marked a man’s entry into full citizenship through military service. It represented his duty, honor, and status.
Gladiators: The very term “gladiator” derives from gladius. Arena fighters often used gladii (along with other weapons), and their combat, while theatrical, drew directly from military techniques.
Legal and ceremonial uses: Officers wore gladii as badges of rank. The gladius appeared in religious ceremonies, legal proceedings, and official iconography.
“Ave Caesar, morituri te salutant” (Hail Caesar, those who are about to die salute you): While this famous phrase is associated with gladiatorial combat, it reflects the gladius’s central role in Roman cultural consciousness.
The Pilum: Engineering Genius in a Throwing Spear
If the gladius embodied Roman tactical doctrine in close combat, the pilum represented Roman military engineering and innovation at its finest. This wasn’t simply a pointed stick to throw—it was a sophisticated weapons system designed to solve specific tactical problems.
Design and Construction: Form Follows Function
The pilum’s unusual design puzzled archaeologists for years until systematic testing revealed its brilliant engineering principles.
Overall specifications:
Total length: Approximately 2 meters (6.5 feet), though this varied by type
Total weight: 2-5 kg (4.4-11 lbs) depending on type
Components: Wooden shaft + iron shank + pyramidal point
The tri-part construction:
1. Wooden shaft (hasta):
Length: Approximately 1.2-1.4 meters (4-4.5 feet)
Material: Usually ash, oak, or similar hardwoods chosen for strength and flexibility
Diameter: 3-4 cm (1.2-1.6 inches), sized for secure grip
Weight: Approximately 0.5-1 kg (1-2 lbs)
Function: Provided throwing leverage and contained most of the weapon’s mass, giving it throwing momentum
2. Iron shank (ferrum):
Length: 60-100 cm (24-40 inches)—nearly equal to or longer than the wooden shaft
Material: Soft iron (not steel), which was critical to the design
Shape: Long, thin, square or round cross-section, tapering toward the point
Thickness: Just 5-8 mm (0.2-0.3 inches) in diameter
Weight: Approximately 1-3 kg (2-6 lbs)
Why so long and thin?: This counterintuitive design was intentional and brilliant:
- Penetration: The long thin shank concentrated force on a small area, increasing armor penetration
- Range: The forward weight bias improved accuracy and distance
- Bending: The soft iron shank would bend on impact, which was a feature, not a bug (more on this below)
3. Pyramidal point:
Shape: Four-sided pyramid, hardened through quenching or case-hardening
Purpose: Concentrated impact force on the smallest possible area for maximum penetration
Hardness: Unlike the soft iron shank, the point was hardened to pierce armor and shields
Types of Pilum
Archaeological evidence reveals several pilum variants, each optimized for specific tactical roles.
Heavy Pilum (pilum grave):
Weight: 4-5 kg (9-11 lbs)
Purpose: Maximum penetration at shorter ranges (10-15 meters)
Characteristics: Heavier iron shank, sometimes with lead weights added to increase momentum
Tactical use: Thrown just before contact to break enemy formations and disable shields
Light Pilum (pilum levis):
Weight: 2-3 kg (4-7 lbs)
Purpose: Extended range (20-30 meters or more)
Characteristics: Thinner shank, lighter overall construction
Tactical use: Thrown earlier to disrupt enemy advance and inflict casualties at range
Standard loadout: Each legionary carried both types—throwing the light pilum first at longer range, then the heavy pilum at close range before drawing the gladius.
The Brilliant Bending Design
The pilum’s most ingenious feature was something that initially seems like a flaw: the iron shank was designed to bend after impact.
Why intentionally make a weapon bend?
1. Prevents return throws: If an enemy picked up your pila and threw them back, they’d be facing the same weapon system you just used. Bending prevented reuse.
2. Shield disabling: When a pilum struck a shield, it would:
- Penetrate the shield
- Bend under the shield’s weight
- Create a long, bent shaft dragging on the ground
- Force the enemy to either discard the shield (leaving them unprotected) or fight encumbered by the bent pilum attached to their shield
3. Wound complication: A pilum that bent inside a body wound was nearly impossible to extract quickly, incapacitating the victim and demoralizing nearby fighters.
How was this achieved?
Soft iron construction: Unlike steel, which is hard and brittle, soft iron bends rather than breaking
Heat treatment: Only the tip was hardened; the shank remained soft
Intentional weak points: Some pila had soft iron rivets connecting shank to shaft, designed to break on impact
Engineering validation: Modern experimental archaeology, including high-speed camera studies, confirms that pila bend as described in ancient sources.
Historical accounts:
Plutarch describes Caesar’s troops at the Battle of Pharsalus (48 BCE) noting how Pompeian soldiers’ shields were disabled by bent pila.
Caesar himself in his Commentaries mentions how pila bent on impact, preventing their reuse.
Throwing Techniques and Range
Throwing a pilum effectively required training and technique, not just strength.
The throwing motion:
Grip: Held at the balance point (approximately where wooden shaft met iron shank)
Stance: Weight on back foot, pilum held overhead or by the ear
Throw: Weight shifts forward as arm extends, similar to modern javelin throw
Release: Pilum leaves hand at optimal angle (approximately 30-40 degrees) for maximum distance
Training: Legionaries practiced throwing extensively at various distances and against different targets (man-shaped posts, shields, etc.)
Effective ranges:
Maximum range: A trained soldier could throw a light pilum 30+ meters (100+ feet), though accuracy decreased significantly beyond 20 meters
Effective range: Most pilum volleys occurred at 10-20 meters (30-65 feet), where accuracy remained high
Close range: Heavy pila were thrown at 5-15 meters (15-50 feet) just before contact
Accuracy: At 15 meters, trained legionaries could reliably hit man-sized targets; at 30 meters, accuracy dropped but volley fire still saturated target areas
Tactical Employment: The Pilum in Battle
The pilum’s true genius emerged in how it was integrated into Roman tactical doctrine.
The sequence of battle:
Phase 1 – Approach: Roman forces advance in formation toward the enemy
Phase 2 – First pilum volley (20-30 meters): Legionaries throw light pila to disrupt enemy formations and inflict initial casualties
Phase 3 – Second pilum volley (10-15 meters): Heavy pila thrown to break enemy cohesion, disable shields, and create chaos just before contact
Phase 4 – Contact: With enemies’ formations disrupted and many shields disabled, legionaries close with gladii for close combat
Why this sequence was devastating:
Psychological pressure: The advancing Romans presented a terrifying sight—disciplined lines moving forward relentlessly
Shield disabling: By the time of contact, many enemy shields were unusable, giving Romans significant advantage
Formation disruption: Casualties and confusion from pilum volleys broke enemy battle lines, allowing Roman formations to stay intact while enemies became disordered
Momentum: The pilum volleys created forward momentum that carried Roman troops into the enemy with psychological and physical advantage
Historical examples:
Battle of Aquae Sextiae (102 BCE): Marius’s legions used pilum volleys to devastating effect against the Teutones, a Germanic tribe. The massed pilum throws broke the Germanic shield wall before close combat even began.
Caesar’s Gallic campaigns: Caesar’s Commentarii de Bello Gallico (Commentaries on the Gallic War) repeatedly describes pilum volleys breaking Gallic charges and disrupting their formations.
Battle of Carrhae (53 BCE): Even in Rome’s defeat, the pilum’s limitations were instructive. Against Parthian mounted archers who never closed to contact, the pilum’s close-range design proved inadequate—a lesson that led to tactical adaptations.
Engineering Evolution and Innovations
The pilum continued evolving throughout the Republic and Empire as Romans refined the design based on combat experience.
Marian modifications (late 2nd century BCE):
The problem: General Gaius Marius (157-86 BCE) noticed that while pila bent as designed, sometimes they didn’t bend reliably
The solution: Marius reportedly replaced one of the two iron rivets connecting the shank to the wooden shaft with a wooden peg designed to break on impact, ensuring the pilum would bend or separate
Later variations:
The spiculum: A lighter, shorter javelin that emerged in the late Empire, reflecting changing tactical needs as the Roman military system evolved
Weighted pila: Some versions included lead weights behind the point, increasing penetrating power
Hardened shanks: As metal-working improved, some later pila featured partially hardened shanks that resisted bending—though this represented a departure from classical design principles
The Combined System: Gladius and Pilum in Action
Understanding each weapon individually is important, but their true power emerged when used together as an integrated tactical system.
The Roman Battle Sequence
Let’s walk through a typical Roman engagement to see how these weapons worked together:
Phase 1 – Approach March (100+ meters from enemy):
Formation: Legionaries advance in cohorts (480-man units), maintaining formation spacing and alignment
Equipment readiness: Each soldier carries two pila in his left hand, shield on left arm, gladius sheathed on right hip
Psychological impact: The sight of disciplined Roman formations advancing silently or with rhythmic marching songs was itself intimidating
Phase 2 – First Pilum Volley (approximately 20-30 meters):
Command: Centurions give the order to throw
Execution: Front ranks throw light pila at enemy formations
Effect: Casualties among enemy troops, shield damage begins, enemy formation starts to waver
Roman advantage: Romans maintain formation while throwing; enemies must receive volleys while trying to maintain their own cohesion
Phase 3 – Second Pilum Volley (approximately 10-15 meters):
Command: Second throw command
Execution: Front ranks throw heavy pila
Effect: More casualties, widespread shield disabling, gaps appear in enemy formation, psychological pressure mounts dramatically
The critical moment: This is when battles were often decided—if enemy formations broke under pilum volleys and fled, Romans could pursue and destroy them with minimal losses
Phase 4 – The Charge and Close Combat:
Drawing gladii: With both pila thrown, legionaries draw their swords in a practiced motion while still advancing
Shield wall contact: Roman shield wall hits enemy formations, with legionaries using shields to push and create openings
Gladius work: Short, controlled thrusts exploit openings, targeting vital areas
Rotation: As front-line soldiers tire (close combat is exhausting), they rotate back and fresh troops move forward—a tactic impossible without the discipline and training that defined Roman forces
Phase 5 – Pursuit or Withdrawal:
If victorious: Light infantry and cavalry pursue routing enemies, maximizing casualties
If stalemate or defeat: Roman formations withdraw in good order, maintaining unit cohesion to prevent rout and massacre
Why This System Dominated Ancient Warfare
The gladius-pilum combination proved superior to many other contemporary military systems:
Against Greek phalanxes:
Greek strength: Dense formation of spearmen (sarissa pikes 4-6 meters long) was nearly impenetrable from the front
Roman counter: Pilum volleys couldn’t break the phalanx directly, but Romans used maneuverability to hit flanks and rear, where phalanxes were vulnerable. Once at close quarters, gladii were more useful than long pikes.
Historical example: Battle of Pydna (168 BCE)—Romans initially struggled against Macedonian phalanx but won through superior flexibility and gladius work in broken terrain
Against Celtic warriors:
Celtic strength: Fierce individual warriors using long slashing swords and courage
Roman counter: Disciplined formations absorbed Celtic charge, pilum volleys disrupted their rush, and Roman gladius technique proved more efficient than Celtic slashing in sustained combat
Historical example: Caesar’s campaigns in Gaul (58-50 BCE)—repeatedly defeated numerically superior Celtic forces through superior tactics and equipment
Against Germanic tribes:
Germanic strength: Large, strong warriors with courage and ferocity, often fighting in dense formations
Roman counter: Similar to Celtic engagements—discipline, pilum volleys, and gladius technique overcame raw strength
Historical example: Teutoburg Forest (9 CE)—When Romans were ambushed in forest terrain where formations couldn’t form properly and pila couldn’t be thrown effectively, they suffered catastrophic defeat, proving the system’s dependence on open terrain and formation integrity
Against Eastern armies (Parthians, Sassanids):
Eastern strength: Heavy cavalry (cataphracts) and mounted archers with superior mobility
Roman challenge: Pilum-gladius system designed for close infantry combat struggled against mobile cavalry that refused to close
Roman adaptation: Developed auxiliary cavalry and archers, modified tactics for fighting mobile opponents
Historical example: Battle of Carrhae (53 BCE)—Roman defeat when facing primarily mounted opposition showed system’s limitations outside infantry-vs-infantry contexts
Training and Discipline: Making the System Work
The weapons themselves weren’t magical—their effectiveness depended entirely on extensive training and iron discipline.
Training duration: Recruits typically trained for 4-6 months before joining active legions, with training continuing throughout military service
Training methods:
Physical conditioning: Running, marching with heavy packs, swimming, and strength training prepared soldiers for combat’s physical demands
Weapon drills: Hours daily practicing pilum throws and gladius techniques against training posts and in mock combat
Formation practice: Units drilled in maintaining formations, executing complex maneuvers, and responding to commands
Stress inoculation: Training included elements designed to simulate combat stress—noise, confusion, physical exhaustion—so soldiers would perform effectively in actual battle
Discipline enforcement: Roman military discipline was legendary and brutal. Punishment for failure ranged from physical beatings to decimation (executing every tenth man) for units that fled. This harsh discipline, combined with rewards for bravery, created armies that maintained cohesion even under extreme pressure.
Production, Logistics, and Economic Impact
Behind every gladius and pilum stood a sophisticated military-industrial complex that armed and supplied Roman legions across a vast empire.
Manufacturing and Quality Control
Roman weapons manufacture evolved from individual craftsmen to something approaching industrial-scale production.
Manufacturing locations:
Regional armories: Major military bases included fabricae (armories) where weapons were manufactured
Private contractors: Especially during the Republic, private weapons makers supplied the military
Standardization: By the Empire, weapons production followed standardized patterns, allowing interchangeable parts and consistent quality
Quality control: Military authorities inspected weapons, rejecting substandard examples. Many surviving gladii show inspection marks or maker’s stamps.
Production techniques:
Iron smelting: Producing iron required sophisticated metallurgy, including bloomery furnaces reaching temperatures of 1,200°C (2,200°F)
Forging: Blacksmiths shaped hot iron through repeated heating and hammering
Pattern welding: Higher-quality gladii sometimes used pattern welding (combining iron strips with different carbon contents) to create blades with both flexibility and hardness
Hardening: Selective heat treatment hardened edges while maintaining flexible spines
Finishing: Grinding, polishing, and sharpening completed the weapon
Supply Chain and Logistics
Keeping hundreds of thousands of legionaries armed required remarkable logistical capabilities.
Scale of demand: At its height, the Roman military included approximately 300,000-400,000 legionaries, each requiring:
- At least one gladius
- Two pila
- Complete armor and shield
- Regular replacements due to combat damage and wear
Supply routes: Roman roads, originally built for military movement, also facilitated weapons transport from manufacturing centers to frontier legions.
Storage and maintenance: Each military camp included armories for weapon storage and workshops for repair and maintenance.
Replacement cycle: Weapons required regular replacement due to combat damage, rust, and wear. Well-maintained gladii and pila might last years; those seeing heavy combat might need replacement within months.
Cost considerations:
Material costs: Iron was expensive, requiring mining, smelting, and skilled labor
Labor costs: Skilled weapons smiths commanded premium wages
Transport costs: Moving heavy weapons across vast distances added significant expense
Economic impact: Military procurement represented a major expense in the Roman budget and drove significant economic activity in manufacturing regions
Archaeological Evidence and Modern Discoveries
Our understanding of gladii and pila comes from multiple sources:
Archaeological finds:
Intact examples: Waterlogged sites, particularly at ancient battle sites like Kalkriese (Teutoburg Forest) and Alesia (Caesar’s Gallic Wars) have yielded well-preserved weapons
Pompeii and Herculaneum: The volcanic destruction of these cities preserved many weapons in remarkable condition
Frontier sites: Roman military camps along Rhine, Danube, and Hadrian’s Wall have produced numerous weapons
Grave goods: Some gladii and pila appear in burials, particularly of veteran soldiers
Experimental archaeology: Modern researchers have created replica weapons and tested them extensively, validating ancient descriptions and revealing how they actually performed in combat conditions.
Legacy and Influence on Later Warfare
The gladius and pilum’s influence extended far beyond the fall of Rome.
Medieval and Renaissance Influence
Short swords: The gladius influenced medieval arming swords and later short swords, though medieval designs grew longer due to changes in armor and tactics
Spear evolution: The pilum’s penetrating design influenced later spear and pike development, though the intentional bending feature was abandoned
Combined arms: The concept of integrating ranged and close-combat weapons in coordinated sequences influenced medieval and Renaissance military thinking
Modern Military Applications
Infantry tactics: The concept of suppressive fire followed by close assault—essentially a modern version of pilum volleys followed by gladius work—remains fundamental to infantry tactics
Bayonet charges: The bayonet was essentially an attempt to recreate the pilum-gladius sequence with firearms, allowing soldiers to shoot then close with blade weapons
Military education: The gladius and pilum are still studied in military academies as examples of weapons designed for specific tactical doctrines
Cultural Legacy
Language: Beyond “gladiator,” the weapons influenced military terminology across languages
Popular culture: Films, television, and literature continue depicting Roman soldiers with gladii and pila, keeping their image alive in public consciousness
Historical reenactment: Modern historical reenactors recreate Roman military techniques, often discovering insights lost to written records
Museum collections: Gladii and pila remain among the most sought-after artifacts in museums worldwide, drawing millions of visitors annually
Conclusion: The Weapons That Built an Empire
The gladius and pilum weren’t just weapons—they were the physical embodiment of Roman military philosophy. Where other cultures emphasized individual heroics, Rome emphasized system and discipline. Where others relied on superior weapons technology alone, Rome created an integrated tactical approach that made relatively simple weapons devastatingly effective.
What made them revolutionary?:
Design optimization: Each weapon was engineered for specific tactical roles within a larger system
Training emphasis: Rome invested enormous resources in training soldiers to use these weapons effectively in coordination
Tactical integration: The weapons didn’t work in isolation—they were components of a sophisticated military machine
Adaptability: Romans continuously refined and adapted their weapons based on combat experience
The deeper lesson: The gladius and pilum’s success teaches us that victory comes not from possessing the most advanced weapons, but from having weapons well-matched to your tactical doctrine, training soldiers comprehensively in their use, and integrating them into a coherent operational system.
Rome didn’t conquer the Mediterranean world because the gladius was longer than other swords or the pilum flew farther than other javelins. Rome conquered because it created a system—of training, tactics, logistics, and discipline—where these weapons could achieve their maximum potential.
This is perhaps the most important lesson these ancient weapons teach us: technology alone never determines victory. How you use technology, how you train people to employ it, and how you integrate it into a larger system—these factors determine success.
When you see a gladius in a museum or read about pila in ancient texts, you’re not just looking at relics of a lost civilization. You’re examining proof that thoughtful design, intensive training, systematic thinking, and unwavering discipline can overcome seemingly superior opponents. You’re seeing the tools that transformed a city-state into an empire that would shape Western civilization for millennia.
The gladius and the pilum didn’t build Rome—but in many ways, Rome built itself around these weapons, creating a military system so effective that echoes of it still resonate in modern warfare. That’s a legacy few weapons can claim.
Check out our sister sites at Curious Fox Learning.